
Testing a connection through a browser means loading a page, waiting for ads and reading a gauge that rounds everything. On a server with no browser it is not an option at all.
Speedtest CLI is Ookla’s official command line client. It reports the same measurement as the web test, in a form you can log, schedule and compare.
What follows is the install, a single test, pinning a specific server so results are comparable, and turning the whole thing into a scheduled measurement in PowerShell.
Step 1: Download Speedtest CLI for Windows
Start by downloading the CLI tool from the official site:
Download Speedtest CLI (Windows)
Unzip the archive. Inside is speedtest.exe, a single self-contained binary with no installer. Put it somewhere permanent, for example C:\Tools\Speedtest.
Add that folder to the system PATH so the command works from any directory.
Step 2: Run Your First Speed Test
Open Command Prompt or PowerShell, and type:
C:\Tools\Speedtest\speedtest.exe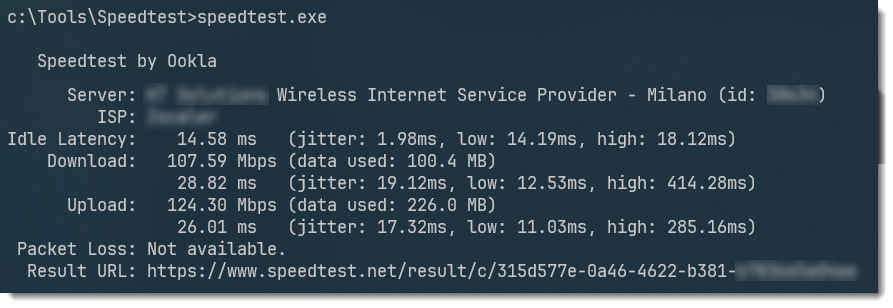
You’ll see:
- Your ISP
- Server location
- Ping (latency)
- Download speed
- Upload speed
- A shareable Result URL
The first run asks you to accept Ookla’s licence and GDPR terms. In a script, pass --accept-license and --accept-gdpr so it does not stop and wait for input.
Want to Pick a Specific Server?
By default the client picks the nearest server. To compare like with like over time, pin one server explicitly:
1. List Nearby Servers:
speedtest.exe --servers2. Run the Test with a Specific Server ID:
speedtest.exe --server-id 12345That matters when you benchmark against a specific datacentre or ISP node. A different server on every run produces numbers that cannot be compared.
Here’re the switches you can use with speedtest.exe
| Switch | Description |
|---|---|
-h, --help | Show help information |
-v | Increase verbosity (use multiple times like -vvv) |
-V, --version | Print version number |
--accept-license | Accept the license agreement (needed for automation) |
--accept-gdpr | Accept GDPR agreement (required in the EU) |
--servers, -L | List nearby servers |
--server-id=<id>, -s | Use a specific server by ID |
--host=<hostname>, -o | Use server by hostname |
--selection-details | Show server selection information |
--format=json | Output in compact JSON |
--format=json-pretty | Output in pretty-printed JSON |
--format=csv, tsv, jsonl | Output in various machine-readable formats |
--output-header | Include header row for CSV/TSV |
--unit=MB/s, Mbps, MiB/s, etc. | Customize output unit (for human-readable only) |
--precision=<n> | Set decimal precision (default: 2) |
--interface=<name>, -I | Bind to a specific network interface |
--ip=<address>, -i | Bind to a specific local IP address |
--ca-certificate=<path> | Use custom CA certificate (advanced use case) |
--progress=yes|no, -p | Enable/disable the progress bar |
--progress-update-interval=<ms> | Set interval (100–1000 ms) for progress updates |
Basic PowerShell Automation
Running the same command by hand every hour is not a measurement. This is where PowerShell takes over.
A minimal script that runs one test and appends the result to a log:
# Define full path to speedtest.exe (change this if needed)
$speedtestPath = "C:\Tools\Speedtest\speedtest.exe"

# Check if speedtest.exe exists
if (-Not (Test-Path $speedtestPath)) {
    Write-Error "speedtest.exe not found at $speedtestPath. Please verify the path."
    exit
}

# Run the speed test and parse JSON output
try {
    $output = & $speedtestPath --accept-license --accept-gdpr --format json | ConvertFrom-Json
}
catch {
    Write-Error "Failed to execute speedtest. Error: $_"
    exit
}

# Create a structured log object
$log = [PSCustomObject]@{
    Timestamp = Get-Date
    Ping      = $output.ping.latency
    Download  = [math]::Round($output.download.bandwidth / 125000, 2)  # Mbps
    Upload    = [math]::Round($output.upload.bandwidth / 125000, 2)    # Mbps
    Server    = $output.server.name
    ISP       = $output.isp
}

# Display results in console
Write-Host "`n=== Speedtest Results ===" -ForegroundColor Cyan
$log | Format-List

# OPTIONAL: Save results to CSV (uncomment the next line to enable logging)
# $log | Export-Csv -Path "C:\Tools\Speedtest\speedtest-log.csv" -Append -NoTypeInformation
Note: dividing bandwidth by 125000 converts to Mbps. The API reports bytes per second, and 1 Mbps is 125,000 bytes per second.
A more complete script
A longer version that keeps the server name and the jitter as well:
$speedtestcmd = & "C:\Tools\Speedtest\speedtest.exe" --accept-license -s 37149 -f json
$speedtestresult = $speedtestcmd | ConvertFrom-Json
$result = [PSCustomObject]@{
    Timestamp     = Get-Date
    ISP           = $speedtestresult.isp
    Server        = $speedtestresult.server.name
    Location      = "$($speedtestresult.server.location), $($speedtestresult.server.country)"
    PingLatencyMs = $speedtestresult.ping.latency
    JitterMs      = $speedtestresult.ping.jitter
    PacketLoss    = if ($speedtestresult.packetLoss) { "$($speedtestresult.packetLoss * 100)%" } else { "N/A" }
    DownloadMbps  = [math]::Round($speedtestresult.download.bandwidth / 1MB * 8, 2)
    UploadMbps    = [math]::Round($speedtestresult.upload.bandwidth / 1MB * 8, 2)
    ResultURL     = $speedtestresult.result.url
}
$result
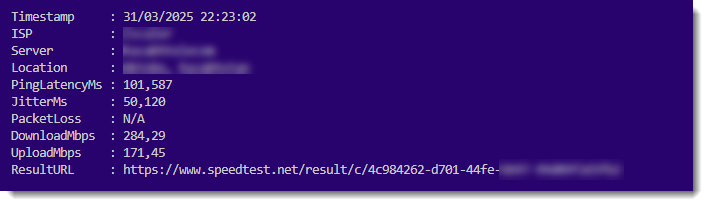
Alerts and toast notifications
The same result can raise an alert when throughput drops below what the line is supposed to deliver:
if ($result.DownloadMbps -lt 100) {
    Write-Warning "Your download speed is under 100 Mbps!"
}
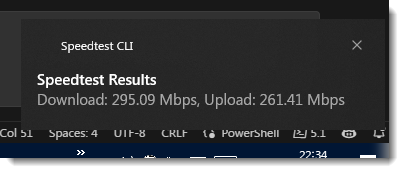
Or a desktop notification:
[Windows.UI.Notifications.ToastNotificationManager, Windows.UI.Notifications, ContentType = WindowsRuntime]
$toastXml = [Windows.UI.Notifications.ToastNotificationManager]::GetTemplateContent([Windows.UI.Notifications.ToastTemplateType]::ToastText02)
$toastXml.GetElementsByTagName("text")[0].AppendChild($toastXml.CreateTextNode("Speedtest Results"))
$toastXml.GetElementsByTagName("text")[1].AppendChild($toastXml.CreateTextNode("Download: $($result.DownloadMbps) Mbps, Upload: $($result.UploadMbps) Mbps"))
$toast = [Windows.UI.Notifications.ToastNotification]::new($toastXml)
$notifier = [Windows.UI.Notifications.ToastNotificationManager]::CreateToastNotifier("Speedtest CLI")
$notifier.Show($toast)
The notification fires from the script itself, so the alert arrives whether or not anyone is watching the console.
What Are Toast Notifications?
Toast notifications are the small pop-ups that appear in the bottom-right corner of your screen (like when Outlook says “You’ve got mail”). PowerShell can trigger these using Windows Runtime APIs — yes, you can be fancy now.
Full Script with Toast Notification & Comments
# ========================================
# Speedtest CLI with Toast Notification
# ========================================

# Path to speedtest.exe (adjust as needed)
$speedtestPath = "C:\Tools\Speedtest\speedtest.exe"

# Ensure speedtest.exe exists
if (-Not (Test-Path $speedtestPath)) {
    Write-Error "speedtest.exe not found at: $speedtestPath"
    exit
}

# Run speedtest with license/GDPR acceptance and JSON output
try {
    $output = & $speedtestPath --accept-license --accept-gdpr --format json | ConvertFrom-Json
}
catch {
    Write-Error "Error while running speedtest: $_"
    exit
}

# Extract and convert results into a friendly object
$result = [PSCustomObject]@{
    Timestamp     = Get-Date
    DownloadMbps  = [math]::Round($output.download.bandwidth / 125000, 2)
    UploadMbps    = [math]::Round($output.upload.bandwidth / 125000, 2)
    PingLatencyMs = $output.ping.latency
    ISP           = $output.isp
    Server        = $output.server.name
}

# Display results in console
Write-Host "`n=== Speedtest Results ===" -ForegroundColor Cyan
$result | Format-List

# ========================================
# Toast Notification Section
# ========================================

# Load Windows Runtime namespace for notifications
[Windows.UI.Notifications.ToastNotificationManager, Windows.UI.Notifications, ContentType = WindowsRuntime] | Out-Null

# Use a two-line text template
$toastTemplate = [Windows.UI.Notifications.ToastTemplateType]::ToastText02
$toastXml = [Windows.UI.Notifications.ToastNotificationManager]::GetTemplateContent($toastTemplate)

# Set the notification's text content safely
$textNodes = $toastXml.GetElementsByTagName("text")
if ($textNodes.Count -ge 2) {
    $textNodes.Item(0).InnerText = "Speedtest Results"
    $textNodes.Item(1).InnerText = "Download: $($result.DownloadMbps) Mbps, Upload: $($result.UploadMbps) Mbps"
}
else {
    Write-Warning "Could not retrieve expected <text> elements from toast template."
    exit
}

# Create the toast notification object
$toast = [Windows.UI.Notifications.ToastNotification]::new($toastXml)

# Show the notification using a named toast notifier
$notifier = [Windows.UI.Notifications.ToastNotificationManager]::CreateToastNotifier("Speedtest CLI")
$notifier.Show($toast)
What This Script Does:
- Runs Speedtest CLI
Executes a test and captures bandwidth, ping, ISP, etc. - Displays the results in PowerShell
Easy to check manually in the terminal - Sends a toast notification
With download & upload speed info, so you can see it even if the terminal is minimized
Schedule regular tests with Task Scheduler
- Open Task Scheduler
- Create a new task
- Set a trigger (e.g., every hour)
- Action: Start a program →
powershell.exe - Add argument:
-ExecutionPolicy Bypass -File "C:\Scripts\SpeedTest.ps1"
With this in place the machine measures itself on a schedule and reports a degraded line before a user does. The schtasks guide covers creating and auditing that task from the command line.
The full option reference
The archive also contains speedtest.md, a full command line reference listing options the built-in help does not mention:
- Use custom units (MB/s, GiB/s, kibps, etc.)
- Output formats like csv, tsv, json-pretty, and jsonl
- Adjust decimal precision with –precision
- Bind tests to a specific network interface or IP
- Control progress display and verbosity
- Handle exit codes and errors with style
Those options are the starting point for feeding results into monitoring: CSV and JSONL output, integration with Zabbix or Prometheus, or posting to a dashboard.
Summary
With speedtest.exe and a short PowerShell wrapper you have:
- A lightweight, fast, ad-free way to test internet speed
- Logging and historical monitoring
- Custom scripts with alerts, notifications, and flexible output
- A professional way to say, “It’s not me, it’s the ISP.”
None of it needs a browser, which is what makes it usable on a server.
Related tools
- Network diagnostics tool — run the same checks from the browser
Related guides
- NETSTAT command in Windows — checking what the connection is actually doing
- netsh command in Windows — configuring the adapter behind the result